How to Make Flour Tortillas from Scratch

Tortillas are quite expensive in Korea. Since I speak Korean, I can easily order tortillas from the internet.
But still, it seems quite expensive to pay about 4 dollars (US) to get 12 sheets of tortillas, then pay the delivery cost which is another 4 dollars.
So I researched a little bit on the weekend to came up with this simple tortilla recipe. I hope you enjoy it!
P.S Here are some of my recipes using tortillas. You might like to try them! Korean BBQ Chicken Pizza and Chicken Bulgogi Burrito
Ingredients for 4 wraps
- 2 cups plain flour
- 2 Tbsp starch powder (corn starch or potato starch)
- 1 tsp fine sea salt
- 3/4 cup water
- 2 tsp olive oil
- 2 Tbsp plain flour (Anti stick purpose while rolling)
How to Make Tortillas from Scratch
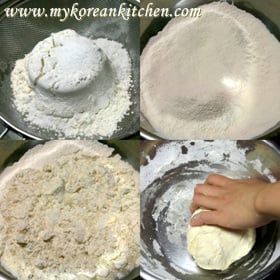
1. Sieve the flour, salt and starch powder.Add the water and olive oil. Kneed the dough. (The recipe I found recommend to leave it like that for about 1 hour in the fridge, but I didn’t have much time to spare, so I just kept going to next step without having any break.) Divide the dough into 4 pieces.
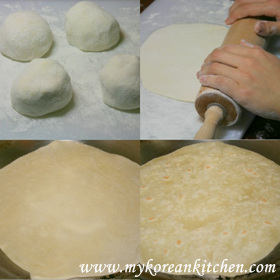
2. Spread the plain flour (2 Tbsp) on the rolling board. One dough at a time, roll the dough lightly on the board into a ball shape.
3. Roll one piece of dough with a rolling pin to flatten and make a thin round shape. (Repeat this for the rest of the dough.)
4. Preheat a skillet / pan for 10 seconds. (No cooking oil is used)
5. Place one tortilla sheet and cook it for 20 – 30 seconds. Turn it over and cook the other side for 20-30 seconds. Remove from the heat.
6. Serve.
Also, if you have better ideas or suggestions to make tortillas with limited resources, I would like to hear about it from you too. 🙂

How to Make Flour Tortillas (with Limited Resources)
Ingredients
- 2 cups plain flour
- 2 Tbsp starch powder (corn starch or potato starch)
- 1 tsp Fine sea salt
- 3/4 cup water
- 2 tsp olive oil
- 2 Tbsp plain flour Anti stick purpose
Instructions
- Sieve the flour, salt and starch powder.Add the water and olive oil. Kneed the dough. (The recipe I found recommend to leave it like that for about 1 hour in the fridge, but I didn’t have much time to spare, so I just kept going to next step without having any break.) Divide the dough into 4 pieces.
- Spread the plain flour (2 Tbsp) on the rolling board. One dough at a time, roll the dough lightly on the board into a ball shape.
- Roll one piece of dough with a rolling pin to flatten and make a thin round shape. (Repeat this for the rest of the dough.)
- Preheat a skillet / pan for 10 seconds. (No cooking oil is used)
- Place one tortilla sheet and cook it for 20 – 30 seconds. Turn it over and cook the other side for 20-30 seconds. Remove from the heat.
- Serve.
Nutrition Info (per serving)
The nutrition information shown is an estimate provided by an online nutrition calculator. It should not be considered a substitute for a professional nutritionist’s advice.
Save This Recipe


