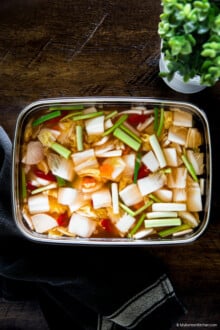
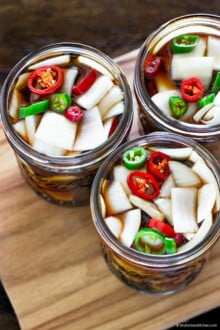
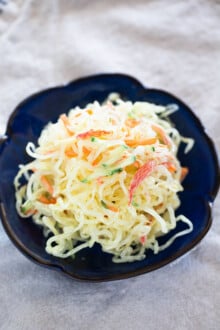
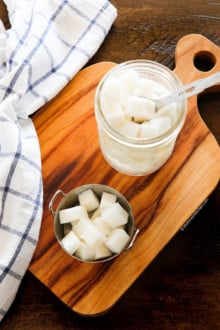
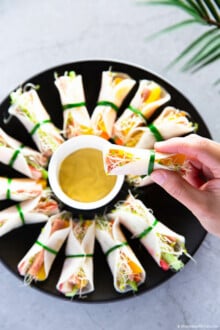
Category Archives: Side Dishes (Banchan)

Seasoned Acorn Jelly (Dotori Muk Muchim)

Seasoned Acorn Jelly (Dotori Muk Muchim)1

When I was a child, I sometimes went hiking with my mom and we picked up some dropped acorns in the hills. I didn’t hike to the very top but on the way back the basket of my bicycle was full of acorns. At that time I didn’t know how they could be eaten by us, humans, because I always thought that they are for squirrels.

In my memory, I don’t think I liked the seasoned acorn jelly that much because of its bitter taste, but now I love it, it is like an adult appreciates good food more than a child. It has a slightly bitter taste from the acorn jelly and a slightly sweet and salty taste from the sauce, which I love, and this recipe is like that.

Seasoned Acorn Jelly (Dotori Muk Muchim)2

Hoping you can get the acorn jelly where you live, here is how the recipe goes.

Ingredients (enough to serve 6-8 people as a side dish) : 5 minutes to serve

  • Acorn jelly (도토리묵) – 420 gSeasoned Acorn Jelly (Dotori Muk Muchim) ingredients
  • 2-3 lettuce leaves
  • 1 green chili (non spicy)

Sauce (mix these in a bowl)

  • Soy sauce – 6 tbsp
  • Dark brown sugar – 1 tbsp
  • Sesame oil – 1 tbsp
  • Finely chopped spring onion – 2 tbsp
  • Parched sesame seed – 1 tbsp
  • Chili powder – 2 tsp
  • Minced garlic – 2 tsp

Prep

  1. Slice the acorn jelly (1 cm -1.5 cm thickness).
  2. Take the seeds out from the chili and thin slice it.
  3. Thin slice the lettuce (thickness doesn’t really matter, but mine was close to 1 cm).

Method A) - Better presentationSeasoned Acorn Jelly (Dotori Muk Muchim) method

  1. Put the sliced acorn jelly on the plate.
  2. Add the sliced chili on top.
  3. Decorate the plate with the lettuce.
  4. Spread the sauce on the top.
  5. Serve it on the table.

Method B) - My mom’s way (it may season the acorn jelly and lettuce better)

  1. Put the lettuce, chili and acorn jelly in a mixing bowl.
  2. Add the sauce and lightly mix it.
  3. Serve it on the plate.

Seasoned Acorn Jelly (Dotori Muk Muchim)4

By the way, a pack of acorn jelly is more expensive than tofu (I thought it would be cheap). It was 3,000 won (US $3.20) for 420 g in Korea. I also bought a pack of acorn powder to make acorn jelly from scratch and it was 6,6oo won (US $6. 30). It was requested by one of my readers. I know I really need to make it soon but apparently it requires continuous stirring for nearly an hour without any break, so I gave up for then. :(

Don’t worry! beloved, I will definitely do it. :)

Related Posts

Soy sauce Boiled Tofu (Dubu Ganjang Jorim in Korean)

Tofu Kimchi (Dubu Kimchi in Korean)

Simmered Lotus in Soy sauce (Yeon-gn Jorim)

Stir Fried Gochujang and Simple Bibimbap

Stir Fried Gochujang1

Today’s post is about a multi purpose condiment “stir fried gochujang”(볶은 고추장). I made this about 3 weeks ago, and since then every time I don’t feel like accomplishing my kitchen duty, it has been a great help. Busy working ladies and gentlemen would love to have this in their fridge, especially if you love Bibimbap. Do you like the idea so far? :)

Stir fried gochujang is literally stir fried gochujang and you add it on some cooked red meat (pork or beef mince) and cook them together a bit . Once you make fair amount of it, you can store it in the fridge for up to 2-3 months. You can use it as a dipping sauce for wrapped meat in lettuce or ddeokbokki sauce or bibimbap sauce.

In my case, I used it as a bibimbap sauce and it was very convenient indeed.

Stir Fried Gochujang4

(My simple Bibimbap – rice with stir fried gochujang and radish sprouts)

Ingredients (as a 15 serving bibimbap sauce)

  • Gochujang – 3/4 cup
  • Honey – 1 tsp
  • Water – 3 tbsp
  • Minced pork or beef – 200 g
  • Sesame oil – 1/2 tsp

Sauce for the pork (mix these in a bowl)

  • Soy sauce – 1/2 tsp
  • Refined rice wine (cooking wine) – 1 tsp
  • Minced garlic – 1/2 tsp
  • Ginger powder – 1/4 tsp
  • Pepper – 3 sprinkles

Steps

Stir Fried Gochujang steps

  1. Rinse the pork in cold water.
  2. Marinate the pork with the sauce and leave it for 5 minutes.
  3. Pre heat the wok and add the sesame oil.
  4. Add the pork and stir it well so the meat doesn’t clot.
  5. Add the gochujang, honey, water and stir it well.
  6. Turn the heat off in 3 minutes.

Stir Fried Gochujang3

I keep it in a container in the fridge, with the lid on of course (You need to cool it down, before you put it in).

Stir Fried Gochujang2

Related Posts

Yangpun Bibimbap

Stir Fried Rice cake with Gochujang Sauce (Ddeokbokki in Korean)

Simmered Lotus in Soy sauce (Yeon-gn Jorim)

Simmered Lotus in Soy sauce (Yeon-gn Jorim) 1

Yeon-gn Jorim is one of my favourite side dishes, and my mom cooks this really well. There are a couple of various ways of cooking lotus and I like the one has a softish chewy texture and sweetish salty taste. Yeah, I know, you have no idea what I am talking about. :) Though if you have ever tried some of this side dish, you understand, right?

Preparation itself is a piece of cake, but it can be a bit of a time consuming process for a single side dish. Mine turned out to be the one that has a sweetish salty taste, but the texture was crunchy. It tasted good (if you prefer a crunchy texture you will love it). Though since I prefer chewy texture I might add extra corn syrup next time, because I think the chewy texture comes from corn syrup, and to get a softish texture, I might need to simmer it a bit longer but I’m not really sure how long it would take me.

Ingredients for 4 people

(Expected Prep time – 3 minutes, Cooking time – 25 minutes)

Simmered Lotus in Soy sauce (Yeon-gn Jorim) ingredients
  • Lotus – 370 g
  • Water – 4 cups
  • Apple vinegar – 1 tbsp

Sauce (mix these well in a bowl)

  • Soy sauce – 5 tbsp
  • Refined rice wine – 4 tbsp
  • Water – 6 tbsp
  • Dark brown sugar – 2 tbsp

Final sauce

  • Corn starch – 1 tbsp
  • Parched sesame – 2 tsp
  • Sesame oil – 2 tsp

Prep

  1. Rinse the lotus in water and scrub off the dirt with a cloth.
  2. Peel the skin with a peeler.
  3. Rinse it once more.
  4. Thin slice it .

Cooking

Simmered Lotus in Soy sauce (Yeon-gn Jorim) cooking
  1. Put the water and vinegar in a pot and add the lotus. Boil it for 20 minutes.
  2. Drain the water and run cold water on lotus.
  3. Put the lotus in a pot and add the sauce. Simmer it on medium heat until the 2/3 of the sauce disappears.
  4. Add the final sauce in the pot, cook it on strong heat for short time.
  5. Serve it on a dish.
Simmered Lotus in Soy sauce (Yeon-gn Jorim) 2

Other food boiled in soy sauce

Soy sauce Boiled Tofu (Dubu Ganjang Jorim in Korean)

Braised Baby Potatoes 1 (Algamja Jorim in Korean)

Boiled Beef and Quail’s Eggs in Soy sauce (Sogogi Jangjorim in Korean)

Seasoned Green Bean Sprouts (Sukju Namul Muchim in Korean)

Seasoned Green Bean Sprouts (Sukju Namul Muchim in Korean)1

I am into these green bean sprouts lately. They give a flavourful taste to soup and a savory taste to side dishes. I don’t make many side dishes (I prefer one dish meals that don’t require any side dishes, because it is simple and quick, and I don’t need to wash many plates later on :) ), but I thought I should try some side dish recipes to show you, since I haven’t made one for a while. So I tried making seasoned green bean sprouts and the more I eat them, the more I like them.

Their flavour comes out with a good balance of salt, garlic and sesame oil. They have a mild taste and chewing their fiber is another pleasure (They give a bit of a soft yet crunchy feeling).

Ingredients for 4 people

(Prep time – 2 minutes, Cooking time – 10 minutes)

  • Green bean sprouts 250 g
  • Salt – ½ tsp
  • Sesame oil – 1 tsp
  • Minced garlic – 1/8 tsp
  • Finely chopped green onion – 2 tsp
  • Parched sesame – 1/8 tsp

Steps

Seasoned Green Bean Sprouts (Sukju Namul Muchim in Korean) steps1
  1. Rinse the green bean sprouts in cold water, discard the bad beans.
  2. Boil some water in a pot. (I used 3 cups of water)
  3. Add the green bean sprouts when the water starts to boil.
  4. Par boil them for 2 minutes.
  5. Drain the water. Cool down the sprouts. (if you lift them with tongs or chopsticks frequently, it cools down faster.)
  6. Add the salt on top (sprinkle it all over the place) and leave it like that for 3 minutes.
  7. Squeeze the green bean sprouts with your hands. (discard the water if it comes out)
  8. Add the rest of the seasoning sauce, and mix them well.
  9. Serve them on a dish.
Seasoned Green Bean Sprouts (Sukju Namul Muchim in Korean) steps2

Side story about “Sukju Namul” (Green bean sprouts)

Seasoned Green Bean Sprouts (Sukju Namul Muchim in Korean)3

Writing about Korean food certainly makes me study. While I was translating sukju namul into English, which was about a month ago, I found that they are called green bean sprouts in English. Green bean sprouts? Are they made of green beans? I didn’t realize that they are made of green beans (apparently I was ignorant about Korean food and its history before I started this blog), because they disguised their name into sukju all this time. Green bean is Nokdu in Korean, then how come Koreans call green bean sprouts Sukju namul instead of Nokdu namul?

Well, apparently, there is a popular traditional theory and most Koreans seem to believe, that is the true. There was a scholar called Shin Suk-ju in 1462, and he betrayed his king when there was a coup (There was a young king called ‘Danjong’, and his uncle ‘Sejo’ tried to take over the throne.) When the coup happened he was asked to help his king, but he refused to do so. Apparently green bean sprouts go off very easily, so their easily changing characteristic is similar to Shin Suk-ju’s mind. That is why Green bean sprouts are named Sukju namul instead of Nokdu namul.

Apparently green bean sprouts are more nutritious than bean sprouts and have 80 times more nutrients than green beans themself.

Related Posts

Spicy Noodles with Green Bean Sprouts (Sukju Ramyun in Korean)

Thinly Sliced Radish Kimchi

Boiled Beef and Quail’s Eggs in Soy sauce (Sogogi Jangjorim in Korean)

Tofu Kimchi (Dubu Kimchi in Korean)

Tofu Kimchi 1

Many Koreans seem to relate Tofu Kimchi with Soju a lot, which implies that it is popular as a drinking snack. But I made this meal as a side dish to have with some rice. At a restaurant they add some pork as well, but I didn’t have any available in the fridge. I will show you the tofu Kimchi with some meat some other time. However it still tasted really nice without any meat.

Ingredients for 2 people

(No prep required. Cooking time – 7 minutes)

  • Tofu 210 g
  • Sliced Kimchi – 1/2 cup (It doesn’t quite work well with freshly made Kimchi. Recommend to use at least 2-3 weeks old Kimchi)
  • Sugar (I used dark brown sugar) – 1tsp
  • Sesame oil – 1 tsp
  • Parched sesame – 1 tsp
  • Olive oil – 1 tbsp

Cooking

  1. Pre heat the wok for about 10 seconds.
  2. Add the olive oil.
  3. Add the Kimchi and sugar, stir it well until it cooks.
Tofu Kimchi Kimchi

4. Add the sesame oil and parched sesame. (Cooking the Kimchi is done here)
5. Boil the tofu in a pot for about 3 minutes.

Tofu Kimchi tofu1

6. Slice the tofu into medium size pieces.

Tofu Kimchi tofu2

7. Serve the tofu with the Kimchi.

How to eat : Put some Kimchi on top of the tofu, and eat them together (eating when the tofu is still warm is the best).

I think Tofu and Kimchi match each other well. Tofu is mild and Kimchi is spicy to some people. So the mild taste and spicy sour taste compromises well. Also some people don’t like tofu on its own because it has a unique tofu smell. However, in this meal, Kimchi that is seasoned with sesame oil overpowers the tofu smell. So it works really well together. Michael and I really liked both its smell and taste.

Related Posts

Soy sauce Boiled Tofu (Dubu Ganjang Jorim in Korean)

Spicy Mussel Stew (Honghap Jjim in Korean)

Tuna Pancakes (Chamchijeon in Korean)