
Kimchi is a type of fermented food that originates from Korea. Kimchi’s name varies depending on the main vegetables used. Here, you will find my best napa cabbage kimchi recipe made in pogi kimchi (whole cabbage kimchi) style.
This is the most popular variety and is very versatile! You can either eat it as is or use it in your cooking. It’s also a healthy and tasty food with many benefits. Let’s make it at home!
Save This Recipe
Table of Contents
- What is Kimchi?
- Benefits of Homemade Kimchi
- What Does Kimchi Taste Like
- My Best Kimchi Making Tips
- How to Store Kimchi
- Other Kimchi Recipes You Might Like
- What To Do With Kimchi
- Kimchi Ingredients
- How to Make Kimchi
What is Kimchi
Kimchi / Kimchee (김치) is a traditional Korean side dish made from fermented cabbage, radish, or cucumber. It is often categorized by the main vegetable ingredient used to make it.
Kimchi is a staple food in Korean cuisine. Most Koreans have it with almost every Korean meal at least once a day. The most popular kimchi includes baechu kimchi (made with napa cabbage, 배추김치), kkakdugi (made with radish, 깍두기), and oi kimchi (made with cucumber, 오이김치).
Benefits of Homemade Kimchi
One of the advantages of homemade kimchi is that you can control the flavor by controlling the ingredients that go into it. By making it at home, you can use the ingredients that suit your dietary requirement (e.g. vegan kimchi) as well.
You can also control the fermentation process better to meet your taste buds by controlling the temperature of the environment.
Meanwhile, if you want to learn more about the health benefits of kimchi in general, check out this article from WebMD.
What Does Kimchi Taste Like
Kimchi has quite a complex flavor and not every kimchi has the same taste.
First, it is slightly salty because it has been pickled in salty brine for as little as 30 minutes to overnight. Second, it is slightly spicy in general, excluding white kimchi, which does not use any Korean chili flakes.
Third, it has umami flavor. It’s also seasoned with Korean fish sauce to aid fermentation, so as time goes by, the deeper the kimchi’s flavor develops. Forth, ripened kimchi is sour and has a pungent smell. This stage of kimchi is great for cooking.
Though one thing I know is that even though many people love kimchi, there are many people who don’t like it because of its strong garlic smell and taste. Also, the longer it ferments, the stronger the smell and flavor will be, as if something is rotting in your fridge.
My Best Kimchi Making Tips
Making kimchi successfully is more challenging than you might think. That’s because there are many variables that could go wrong. I will highlight some important aspects of making kimchi at home.
1. Brining
Based on my experience, the initial, and most critical step in the process of making a successful kimchi is to brine the napa cabbage.
Brining kimchi cabbage uses the osmotic action of salt to dehydrate the cabbage and season it at an appropriate salinity. Through this process, the fresh smell of cabbage is removed and the growth of various germs that cause the kimchi to become soft is prevented.
Furthermore, it creates an environment in which lactic acid bacteria and enzymes are easy to grow, and this interaction between them allows the kimchi to ripen properly.
Also, if you over-brine kimchi, it can turn out very salty, and there’s nothing you can do to fix this failure. Therefore, it’s important to know the right way to salt it when making kimchi.
2. Timing
Traditionally, making kimchi has been a whole day process. Particularly if it involves kimjang, a Korean traditional kimchi making activity during winter months, it could take two days to complete, depending on the batch size.
Any how, if you decided to follow my recipe, I suggest you don’t change the pickling time as it can affect the taste. I tested different brining time and 6 hours turned out to be the sweet spot. If you pickle for too long, your kimchi will turn out to be very salty. If you pickle for a shorter time, kimchi can taste bland and it might not ferment well. It can even get mouldy quicker too.
3. Portioning
When seasoning the pickled cabbage with the kimchi paste, make sure you mentally portion out the seasoning well from the beginning so that you don’t run out of the paste until the end.
Bear in mind that kimchi won’t look very red immediately after being seasoned. It will gradually turn redder over time during the long fermentation process.
4. Substitutions FAQ
Making kimchi can be challenging enough, finding the right kimchi ingredients can add an additional layer of frustration to the whole experience.
As someone who was born & raised in Korea, I can’t imagine substituting non-Korean ingredients for kimchi, even though I can for other Korean dishes.
Anyhow, here are some questions I bet you have for me, with my answers.
Q1. What can I substitute gochugaru (Korean chili flakes) with?
I think gochugaru is irreplaceable, especially when it comes to kimchi, but then again, there are many people who try other combinations of chili flakes just because they can’t make kimchi otherwise.
These people often use hot paprika powder and/or dry chili flakes as a combination. Just remember that gochugaru is more of a mild type of chili flakes, so if you use these combinations, you will have to play around a bit until the ratio is right to your taste.
Q2. Can I use “other fish sauce” instead of “Korean fish sauce”?
Many people point out that Korean fish sauce is more pungent and salty than Thai or Vietnamese fish sauce. These people often state that you should never substitute these for Korean fish sauce, as it can ruin your kimchi to the point that your kimchi may rot instead of fermenting over time.
That being said, I’ve seen other people using Red Boat 40N and Three Crabs fish sauce quite successfully in their kimchi. I wouldn’t know how, or if, the taste differs compared to when you use Korean fish sauce. I’m too scared to let my hard work on kimchi fail this way, so I haven’t tried it myself. But one of these days, I shall sacrifice on your behalf.
But until then, I will let you make your own choice. I will reiterate it. Your safest bet here is using Korean fish sauce – anchovy sauce, sand lance sauce or similar etc. But if these options are not viable, then take your chance.
Q3. I can’t find saeujeot (salted fermented small shrimps). What can I use instead?
Saeujeot is typically found at a large Korean grocer, either in the fridge or freezer section. General Asian grocers or small Korean grocers may not carry it if demand is low. If you can’t find saeujeot, you can substitute it with Korean fish sauce.
Q4. What can I do to veganize a kimchi recipe?
The main ingredients you will have to substitute to veganize the kimchi is the Korean fish sauce and saeujeot (salted fermented small shrimps). For these, you could use vegan fish sauce or soy sauce / tamari.
5. Additional Ingredients
While the highlight of napa cabbage kimchi is the napa cabbage, you can add other green vegetables to give more texture. These include chives, mustard greens, water parsley, and young radish greens.
Though there is no need to fret if you can’t find them. These are nice to have ingredients, but not essential.
How to Store Kimchi
It is important to know how to store kimchi properly in order to keep it “fresh” longer. The best ways to store kimchi is to keep it in an airtight container and in the refrigerator.
Even better, if you have a specialty fridge like a “kimchi refrigerator” at home, as it will help store kimchi at the perfect temperature. A constant cold temperature will help prevent spoilage and maintain optimal kimchi quality.
As for the airtight container, if you live near a place with a high Korean population, you may be able to buy a “kimchi container” as well. I recommend a stainless steel container in this regard or, at the very least, a BPA-free plastic container.
These kimchi containers go beyond regular airtight containers. Kimchi in these containers really last much longer. One of my kimchi batches still tasted as new even after 4 weeks of fermentation in the fridge.
To ferment faster, I eventually transferred it into a different container. This allowed us to have more of that tangy kimchi flavor. So storage containers do make a difference in the quality and taste of kimchi.
But, be sure to only fill your kimchi container up to 70 or 80% of the way full. This is to prevent the kimchi liquid from overflowing and allow the gas generated by fermentation to circulate around the container instead of out.
The more time kimchi is exposed to oxygen, the quicker it will ferment. This can result in mold developing and raise the risk of a foul odor.
For kimchi storage, an ideal temperature is 3-5 degrees Celsius. So try to minimize opening the fridge door as that leads to fluctuations in the fridge’s internal temperature.
Kimchi can typically last in the fridge for a couple of months, but depending on the storage conditions you could keep it for up to a year or so too.
Other Kimchi Recipes You Might Like
- Kimchi Salad (Geotjeori)
- Radish Kimchi (Kkakdugi)
- Baek Kimchi (White Kimchi)
- Cucumber Kimchi (Oi Kimchi)
What To Do With Kimchi
There are many other dishes you can create with kimchi such as Kimchi Fried Rice, Kimchi Jjigae, and Kimchi Pancake. But if you want even more ideas, check my How to Eat to Kimchi post. There I share 14 delicious ways to eat kimchi.
Kimchi Ingredients
Main Ingredients
- 4kg (8.8 pounds) napa cabbage (Chinese cabbage), remove thick outer cabbage leaves
- 16 cups (3840 ml) water
- 1.5 cups (285g / 10 ounces) Korean coarse sea salt or natural rock salt (for salt water)
- 1/2 cup (97g / 3.4 ounces) cooking salt, medium sized crystals (for sprinkle)
Kimchi Seasoning / Kimchi Paste
- 2 Tbsp glutinous rice flour (sweet rice flour)
- 1.5 cups (360 ml) water
- 1.5 cups (141g / 4.97 ounces) gochugaru (Korean chili flakes)
- 540g / 19 ounces Korean radish or daikon radish, julienned
- 1 Tbsp fine sea salt
- 3.5 Tbsp Korean fish sauce
- 2 Tbsp salted fermented shrimp (saeujeot), minced
- 90g / 3.2 ounces Korean chives, cut in 5 cm / 2 inch length
- 140g / 4.9 ounces carrots, julienned
- 1/4 cup (42g / 1.48 ounces) minced garlic
- 1/2 Tbsp minced ginger
- 2 Tbsp raw sugar
- 75g / 2.6 ounces onion, blended (with a stick blender or vegetable chopper) or finely grated
*1 Tbsp = 15 ml, 1 cup = 250 ml
** If you want to learn more about Korean ingredients, check my essential Korean ingredients list.
How to Make Kimchi
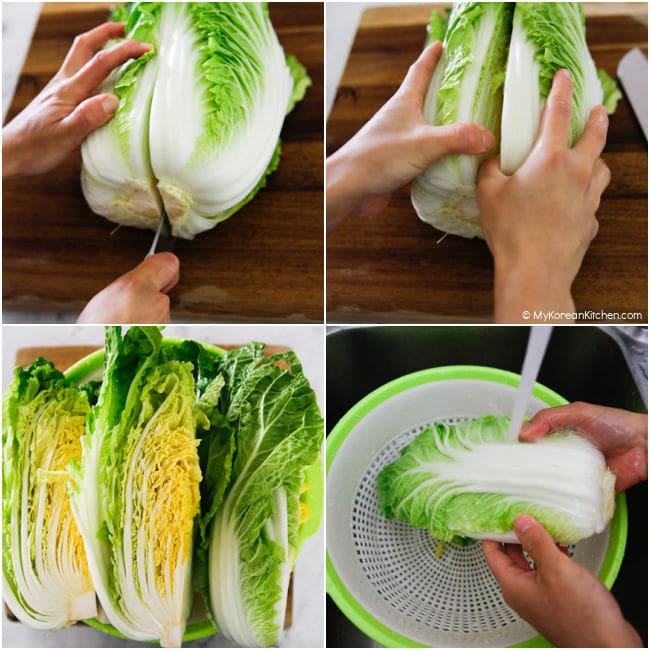
1. Cut the napa cabbage into quarters and rinse it in running water. Make sure the stem is intact.
2. Dissolve the coarse salt in the water (16 cups) in a large bowl. Dip the napa cabbage in the saltwater one at a time and transfer it onto a tray for further salting.
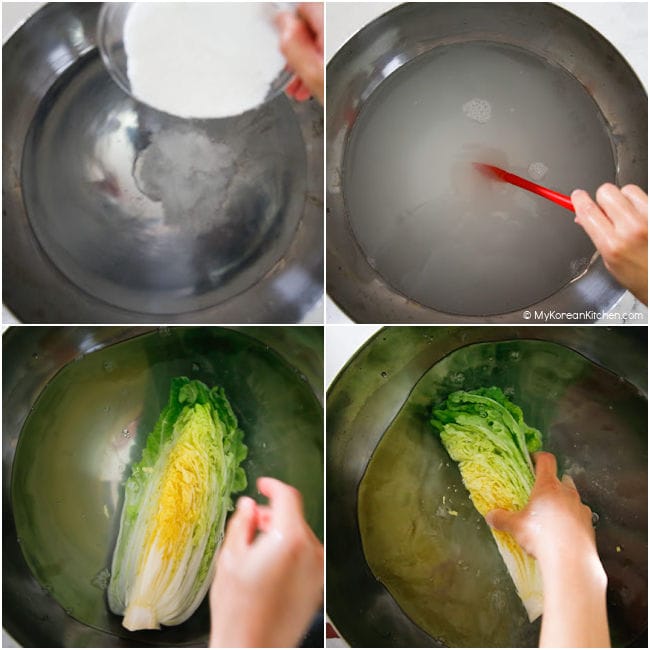
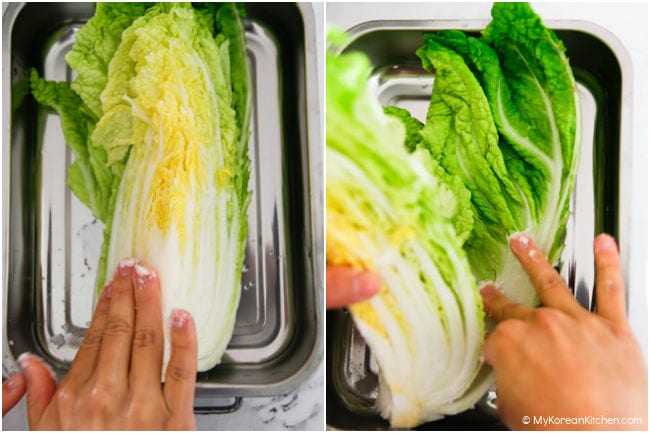
Pinch some cooking salt (1/2 cup total for all pickled cabbages) and rub over the thick white part of the cabbage. Open each leaf gently and sprinkle the salt over the thick white part. Repeat this for the rest of the cabbage. Reserve the saltwater from when you soaked the cabbage for later use.
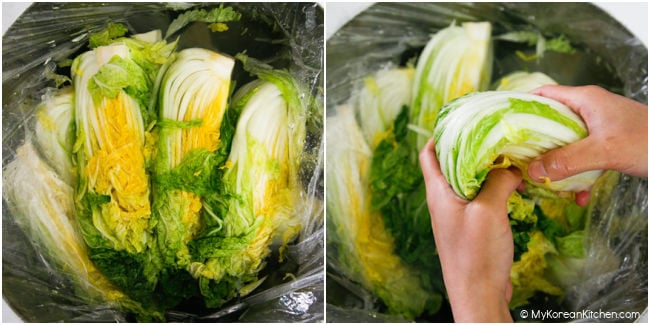
3. Put the salted cabbage in a large food grade plastic bag or large bucket (wedge side of the cabbage to be facing up) and pour in the reserved saltwater from step 2. Close the plastic bag. If using a bucket, get something heavy on top of the cabbage to press down (e.g heavy pot with water).
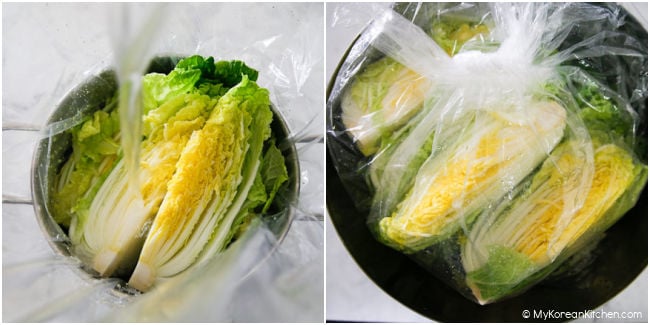
Set the cabbage aside for 6 hours to pickle. Rotate the cabbage upside down every 2 hours. Using a large food grade plastic bag will make the turning process much easier than using a large bucket.
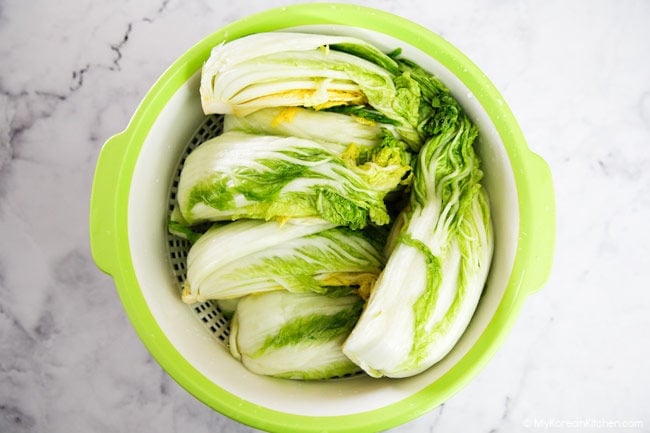
4. Once the soaking process is finished, rinse the cabbages in running water, especially the thick white part of the cabbage, to get rid of the salt. Place them in a colander and allow to drain for 1 hour.
5. While waiting, prepare the glutinous rice paste. Mix glutinous rice flour with the water (1.5 cups) in a saucepan and boil it over medium heat for 5-8 minutes, until it thickens. Once ready, transfer the rice paste to the medium-size bowl and let it cool. Add Korean chili flakes once it has cooled. Then, combine them well.
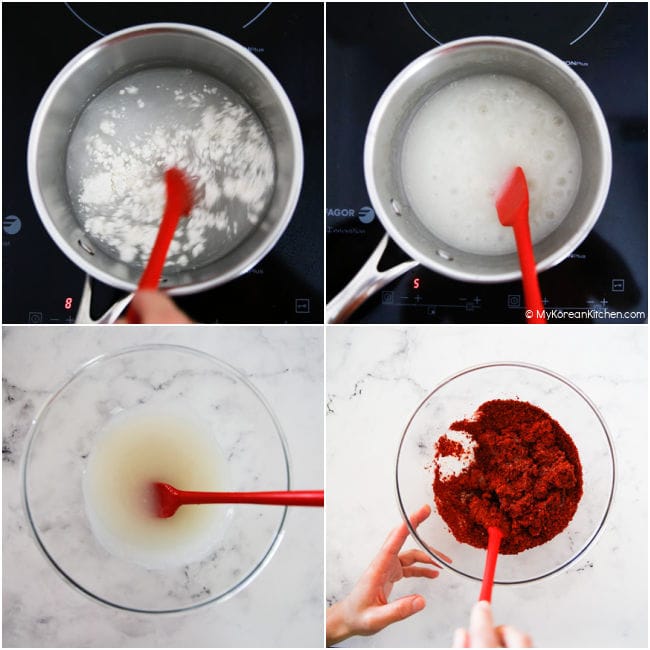
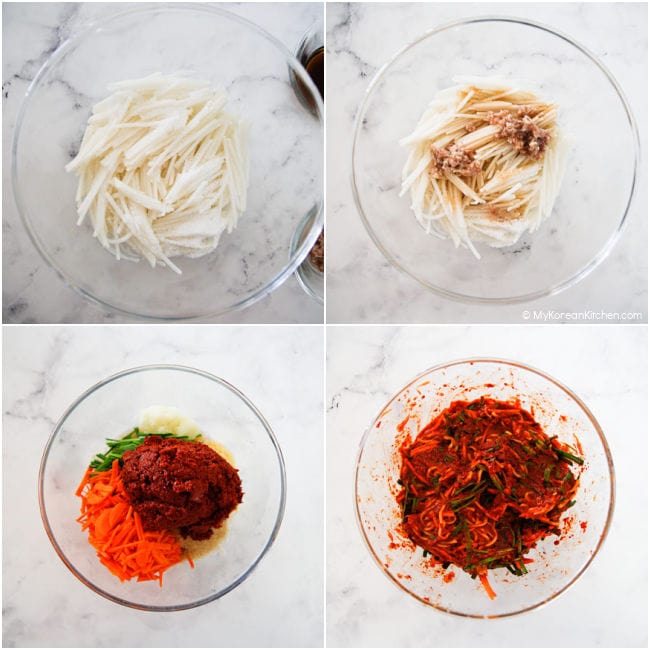
6. Prepare a large mixing bowl and add radish, fine sea salt, Korean fish sauce, and salted fermented shrimp. Leave it for 10 minutes for the radish to salt down. Add Korean chives, carrots, minced garlic, minced ginger, sugar, blended onion, and the Korean chili flakes mixture from step 5. Mix them well. Now the kimchi seasoning / kimchi paste is made, ready for use.
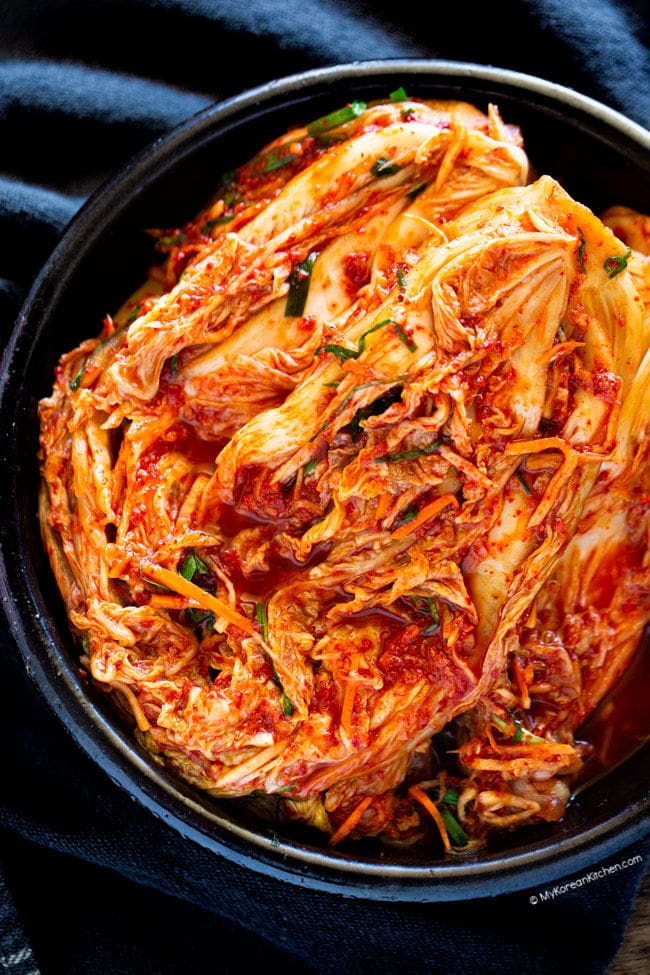
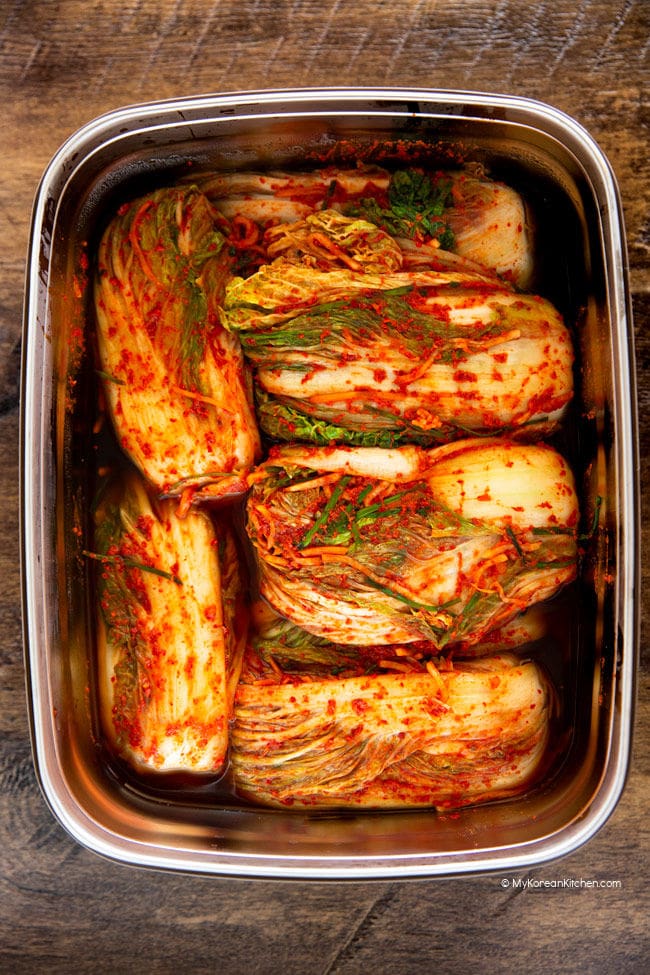
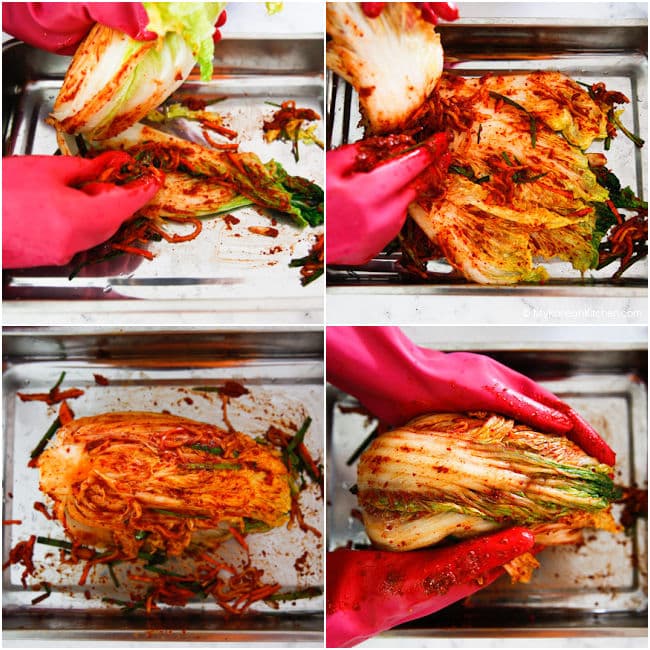
7. Place a quarter of a cabbage on a tray. Spread the seasonings over each leaf. (You only need to season one side of the leaf.) 1 to 2 small fistfuls of seasoning is enough per quarter of cabbage. Repeat this step for the rest of the cabbage. Don’t pull the cabbage leaves off the stem, leave them attached so it holds together better.
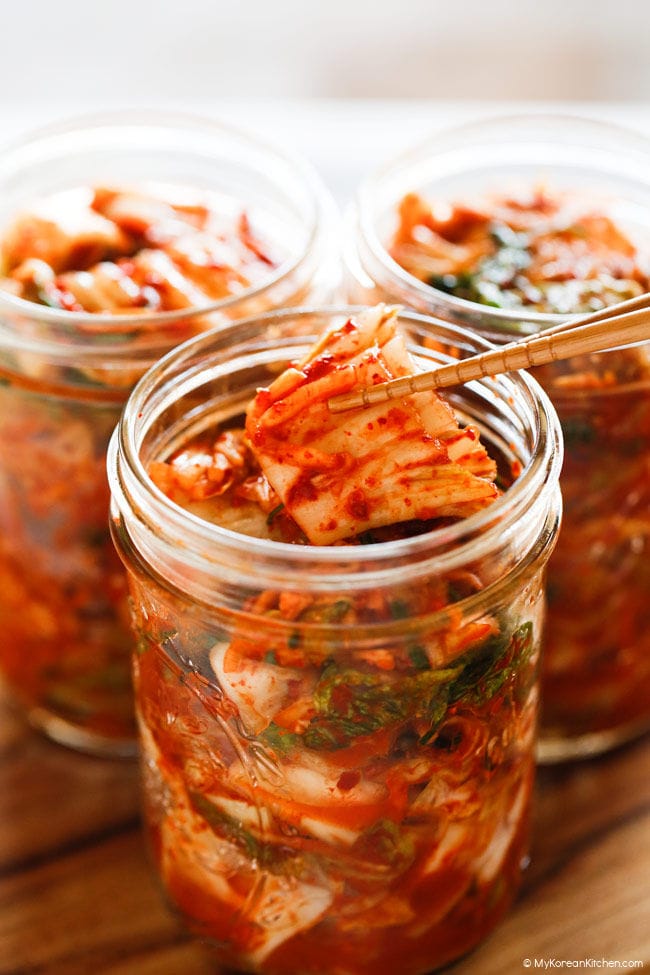
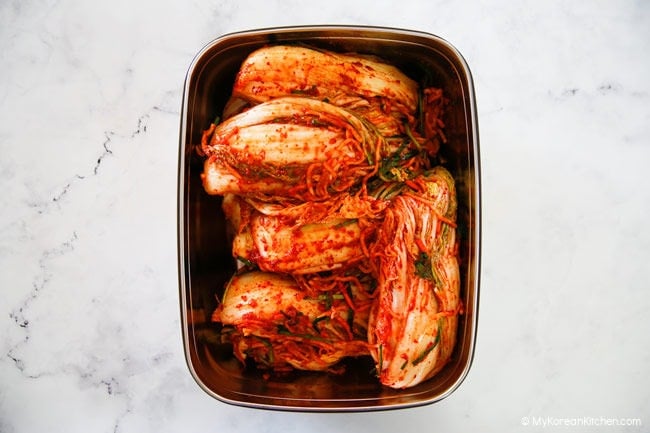
8. Transfer the kimchi into a kimchi container or an airtight container (and put the lid on). Leave it out at room temperature for 24 hours, then move it to the refrigerator. While you can start eating it once it’s chilled, you may want to wait 3-4 more days for it to develop more flavor.
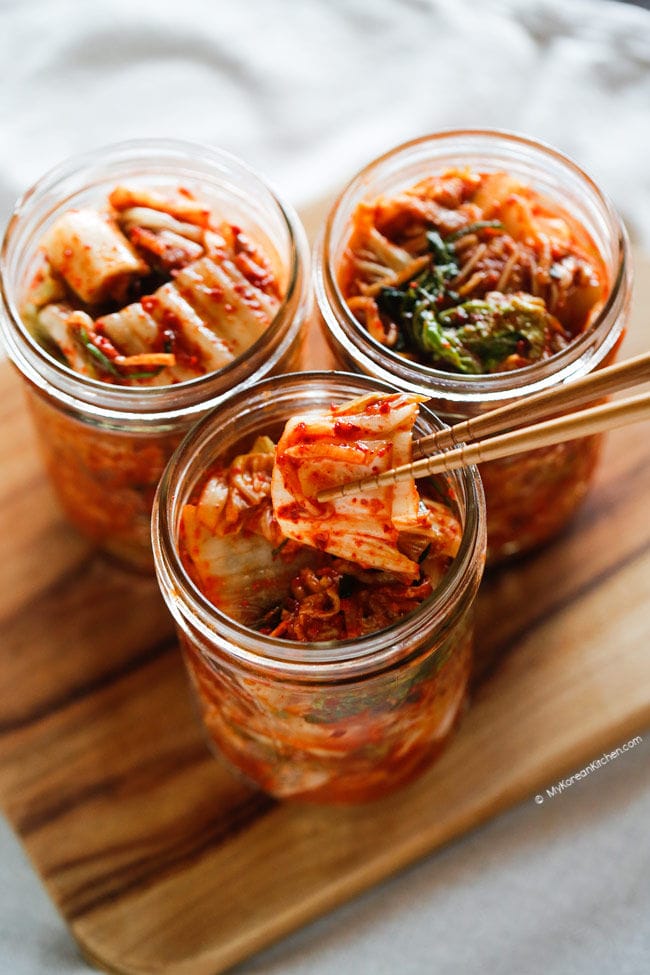
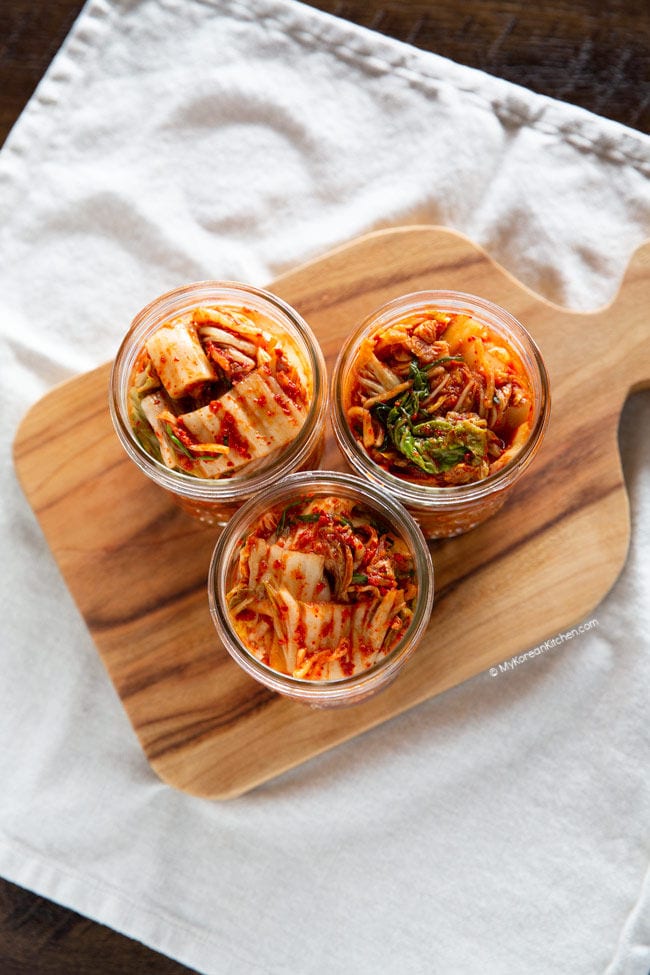
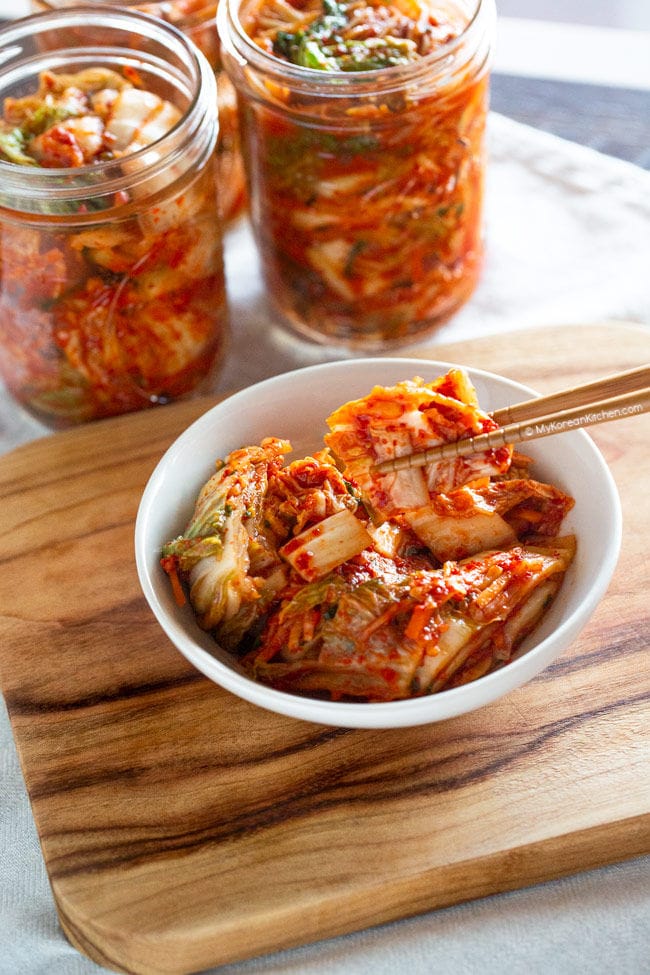
9. Once the kimchi is ready to eat, chop a small portion and store it in a smaller glass container. This makes it more convenient to serve with your meal. Keep the other batches intact in the large kimchi container. This way, you only cut it up as needed, which helps keep the remaining kimchi fresh longer.
Love Korean food? Browse lots more Korean recipes from my easy Korean recipe collections. And subscribe to my newsletter and follow along on Facebook, Pinterest and Instagram for all of the latest updates.
Kimchi Recipe
Ingredients
MAIN INGREDIENTS
- 4 kg napa cabbage (8.8 pounds), remove thick outer cabbage leaves
- 16 cups water (3840 ml)
- 1.5 cups Korean coarse sea salt or natural rock salt (for salt water), (285g / 10 ounces)
- 1/2 cup cooking salt , medium sized crystals (for sprinkle), (97g / 3.4 ounces)
KIMCHI SEASONING / KIMCHI PASTE
- 2 Tbsp glutinous rice flour (sweet rice flour)
- 1.5 cups water (360 ml)
- 1.5 cups gochugaru (Korean chili flakes), (141g / 4.97 ounces)
- 540 g Korean radish or daikon radish (19 ounces), julienned
- 1 Tbsp fine sea salt
- 3.5 Tbsp Korean fish sauce
- 2 Tbsp salted fermented shrimp , minced
- 90 g Korean chives (3.2 ounces), cut in 5 cm / 2 inch length
- 140 g carrots (4.9 ounces), julienned
- 1/4 cup minced garlic (42g / 1.48 ounces)
- 1/2 Tbsp minced ginger
- 2 Tbsp raw sugar
- 75 g onion (2.6 ounces), blended (with a stick blender or vegetable chopper) or finely grated
Instructions
- Cut the napa cabbage into quarters and rinse it in running water. Make sure the stem is intact.
- Dissolve the coarse salt in the water (16 cups) in a large bowl. Dip the napa cabbage in the saltwater one at a time and transfer it onto a tray for further salting.Pinch some cooking salt (1/2 cup total for all pickled cabbages) and rub over the thick white part of the cabbage. Open each leaf gently and sprinkle the salt over the thick white part. Repeat this for the rest of the cabbage. Reserve the saltwater from when you soaked the cabbage for later use.
- Put the salted cabbage in a large food grade plastic bag or large bucket (wedge side of the cabbage to be facing up) and pour in the reserved saltwater from step 2. Close the plastic bag. If using a bucket, get something heavy on top of the cabbage to press down (e.g heavy pot with water).Set the cabbage aside for 6 hours to pickle. Rotate the cabbage upside down every 2 hours. Using a large food grade plastic bag will make the turning process much easier than using a large bucket.
- Once the soaking process is finished, rinse the cabbages in running water, especially the thick white part of the cabbage, to get rid of the salt. Place them in a colander and allow to drain for 1 hour.
- While waiting, prepare the glutinous rice paste. Mix glutinous rice flour with the water (1.5 cup) in a saucepan and boil it over medium heat for 5-8 minutes, until it thickens. Once ready, transfer the rice paste to the medium-size bowl and let it cool. Add Korean chili flakes once it has cooled. Then, combine them well.
- Prepare a large mixing bowl and add radish, fine sea salt, Korean fish sauce, and salted shrimp. Leave it for 10 minutes for the radish to salt down. Add Korean chives, carrots, minced garlic, minced ginger, sugar, blended onion, and the Korean chili flakes mixture from step 5. Mix them well. Now the kimchi seasoning / kimchi paste is made, ready for use.
- Place a quarter of a cabbage on a tray. Spread the seasonings over each leaf. (You only need to season one side of the leaf.) 1 to 2 small fistfuls of seasoning is enough per quarter of cabbage. Repeat this step for the rest of the cabbage. Don’t pull the cabbage leaves off the stem, leave them attached so it holds together better.
- Transfer the kimchi into a kimchi container or an airtight container (and put the lid on). Leave it out at room temperature for 24 hours, then move it to the refrigerator. While you can start eating it once it’s chilled, you may want to wait 3-4 more days for it to develop more flavor.
- Once the kimchi is ready to eat, chop a small portion and store it in a smaller glass container. This makes it more convenient to serve with your meal. Keep the other batches intact in the large kimchi container. This way, you only cut it up as needed, which helps keep the remaining kimchi fresh longer.
Notes
- 1 Tbsp = 15 ml, 1 cup = 250 ml
- If you want to learn more about Korean ingredients, check my essential Korean ingredients list.
- If you skipped over my tips for making kimchi, including substitution information, be sure to read them to increase your chance of success.
- Kimchi can typically last in the fridge for a couple of months, but depending on the storage conditions, you could keep it for up to a year or so. Read more about kimchi storage tips.
Nutrition Info (per serving)
The nutrition information shown is an estimate provided by an online nutrition calculator. It should not be considered a substitute for a professional nutritionist’s advice.

")
")