
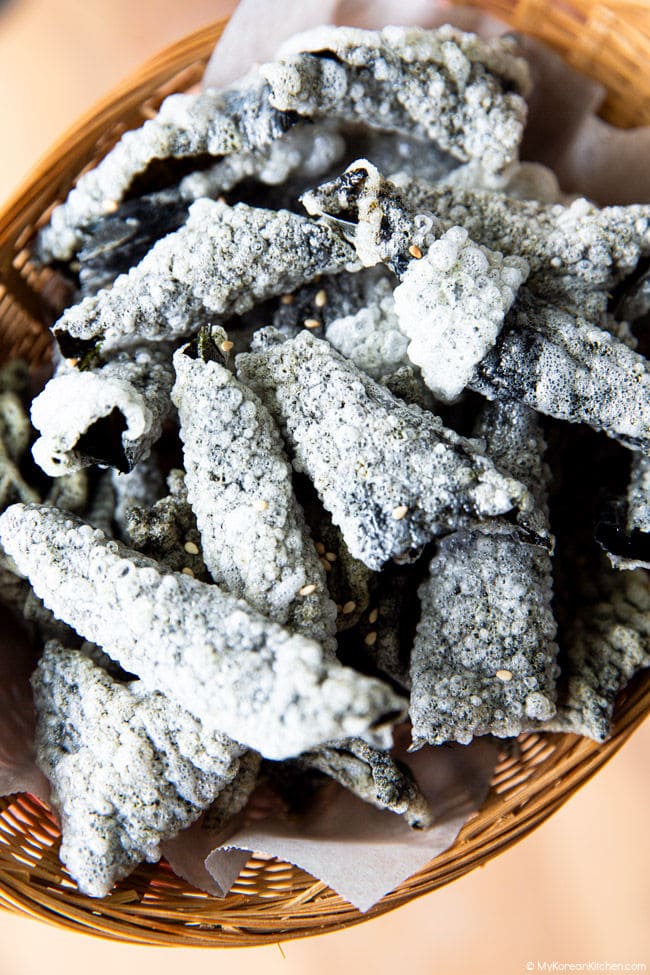
If you love crispy snacks with a little something special, you are going to adore these Korean seaweed chips. Light, shatteringly crisp, and delicately savory, they take simple seaweed and turn it into something completely irresistible. Once you taste that airy crunch, it is hard to stop at just one!
What Are Korean Seaweed Chips
Korean seaweed chips (sometimes called Korean seaweed crisps) are known in Korea as gim bugak (김부각). Gim means seaweed, and bugak refers to ingredients coated in a rice paste, dried, and then fried until crisp. It is a traditional Korean way of preparing seaweed and vegetables that has been enjoyed for generations, including versions made with perilla leaves and chili peppers.
Unlike plain roasted seaweed, gim bugak is coated, fully dried, and then fried. This extra step gives it a completely different texture and character from the seaweed snacks you may already be familiar with.
Can You Use Rice Paper Instead?
You may have seen the rice paper version of seaweed chips online. It became quite popular on social media a couple of years ago as a shortcut method. Instead of brushing on a glutinous rice paste, you layer or attach rice paper to the seaweed before frying. I tested it myself out of curiosity.
While it does work, I found it more fiddly to handle, and the texture was not quite the same. The rice paper crisps, but it does not puff up in that light, bubbly way. The result felt flatter and slightly denser to me.
In the end, I preferred the classic paste method. It gives a cleaner, lighter crunch and feels more reliable once you get used to it. That is why I chose to stick with this approach here.
Why You Should Try This Recipe
Seaweed chips are a nostalgic snack for many Koreans, but what makes this version stand out is the rice paste made with dried kelp stock instead of plain water. That small detail adds a deeper savory flavor and brings out more umami in every bite.
When fried, the coating gently puffs and turns crisp, creating a light crunch that is deeply satisfying. I love this recipe because it transforms simple dried seaweed into something special with just a few basic ingredients. It is easy to make and perfect when you are craving something crunchy and savory at home.
Ingredients
- 1 1/2 cups (375 ml) water
- 1 piece dried kelp (5 x 5 cm, about 2 x 2 inches)
- 1/2 cup (80 g) glutinous rice flour (sweet rice flour)
- 1/2 tsp fine salt
- 2 tsp sugar (optional, for a hint of sweetness)
- 1/8 tsp sesame oil
- 7 sheets dried seaweed (gim or nori)
- Neutral oil for frying (such as rice bran oil or avocado oil)
- Sesame seeds (optional, for garnish)
How to Make Korean Seaweed Chips
1. Prepare the Glutinous Rice Paste:
Start by making a quick kelp stock for extra depth of flavor. In a small saucepan, combine the water and dried kelp. Heat over medium heat until the water is just about to simmer, then remove the kelp. Avoid boiling the kelp for too long, as it can release bitterness. Use this kelp stock in place of plain water for a deeper, more savory flavor. If you do not have dried kelp, simply use water.
In the same saucepan, whisk the glutinous rice flour into the prepared kelp stock until the flour is fully dissolved and no lumps remain. Stir in the salt and sugar. Place the saucepan over medium heat and cook, stirring constantly with a whisk or spatula, until the mixture thickens into a smooth paste, about 3 to 5 minutes. Remove from the heat and stir in the sesame oil. Let the paste cool slightly before using.

2. Coat the Seaweed:
Lay one sheet of seaweed on a flat surface, shiny side facing down. Using a brush or spatula, spread a thin but generous layer of rice paste evenly over the entire surface. Make sure you coat it properly from edge to edge. A gloved hand works beautifully too, especially if you want better control. Repeat with the remaining seaweed sheets.
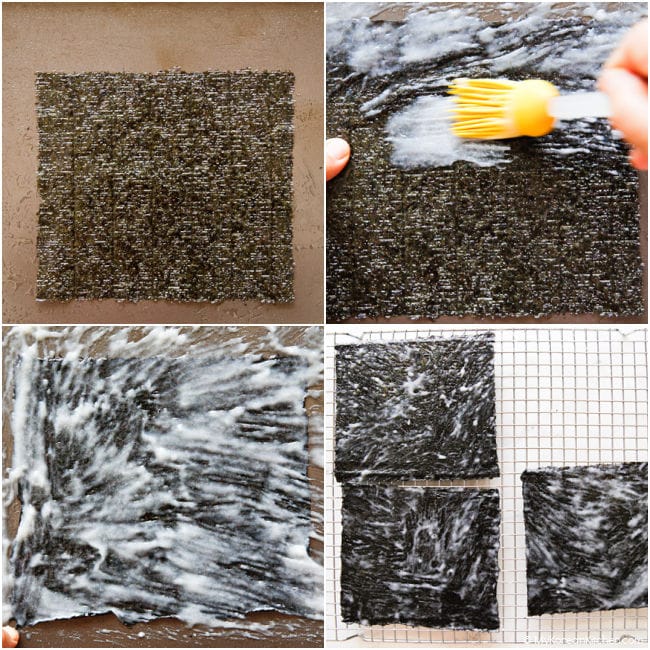
3. Dry the Seaweed:
Once all the seaweed sheets are evenly coated, let them dry completely before moving on. The sheets should feel fully dry and crisp to the touch. The drying time will vary depending on how thickly the rice paste was applied and the surrounding humidity.
You can dry the seaweed in several ways:
Sun drying
Arrange the sheets on a wire rack or baking rack and place them in direct sunlight for about 2 to 3 hours, or until completely dry and crisp. Elevating the seaweed on a rack allows air to circulate underneath, helping it dry more evenly. In humid weather, this may take longer.
Dehydrator
Dry the sheets using a low heat or vegetable setting until they are fully dry and crisp.
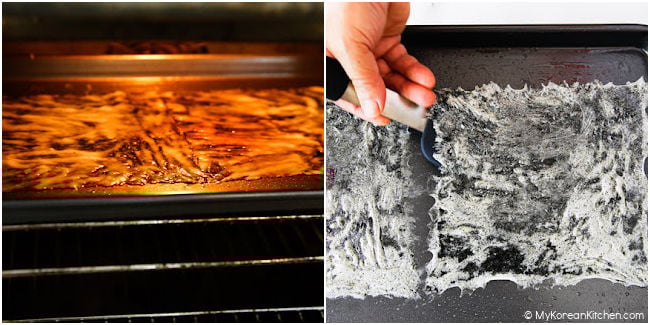
Oven drying
Preheat the oven to 100 C (212 F). Arrange the seaweed sheets on a lightly oiled sheet pan and dry for 40 to 60 minutes, or until completely dry.
Do not line the pan with baking paper, as it can slow the drying process by reducing airflow underneath. Instead, lightly brush oil directly onto the sheet pan so the seaweed releases easily once dried.
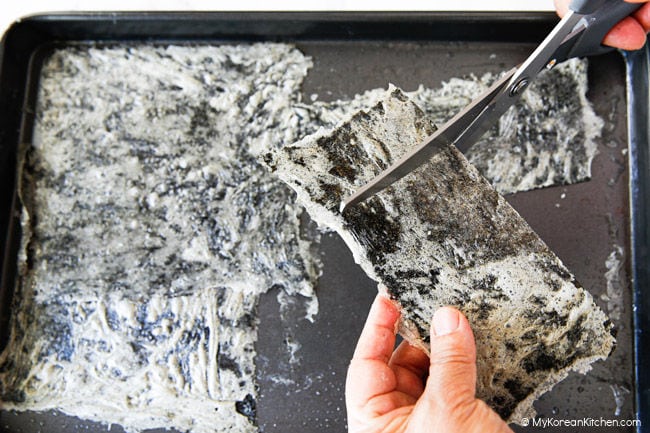
4. Cut the Dried Seaweed into Pieces:
Cut the dried seaweed sheets into bite sized rectangles before frying. Kitchen scissors work best for this. Aim for pieces about 4 to 5 cm wide and 6 to 8 cm long (about 1.5 to 2 inches by 2.5 to 3 inches). Try to keep the pieces fairly even so they fry at the same speed.
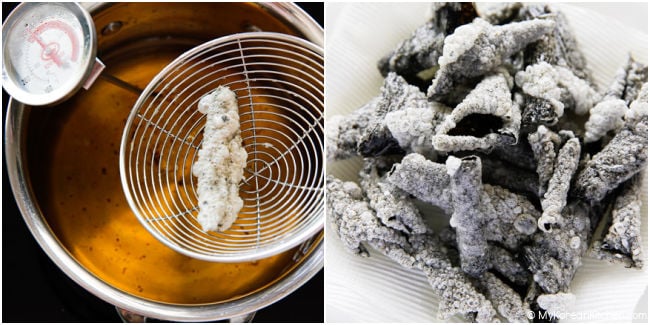
5. Fry the Seaweed:
Heat the oil in a deep frying pan or wok to 356 F (180 C). Make sure there is enough oil to fully submerge the seaweed pieces so they fry evenly. Carefully slide a few pieces into the hot oil, one at a time. Fry for about 10 to 20 seconds, or until they puff up and turn lightly golden. Use a slotted spoon or spider strainer to lift the chips out of the oil and transfer them to a plate lined with paper towels to drain any excess oil. Repeat with the remaining pieces.
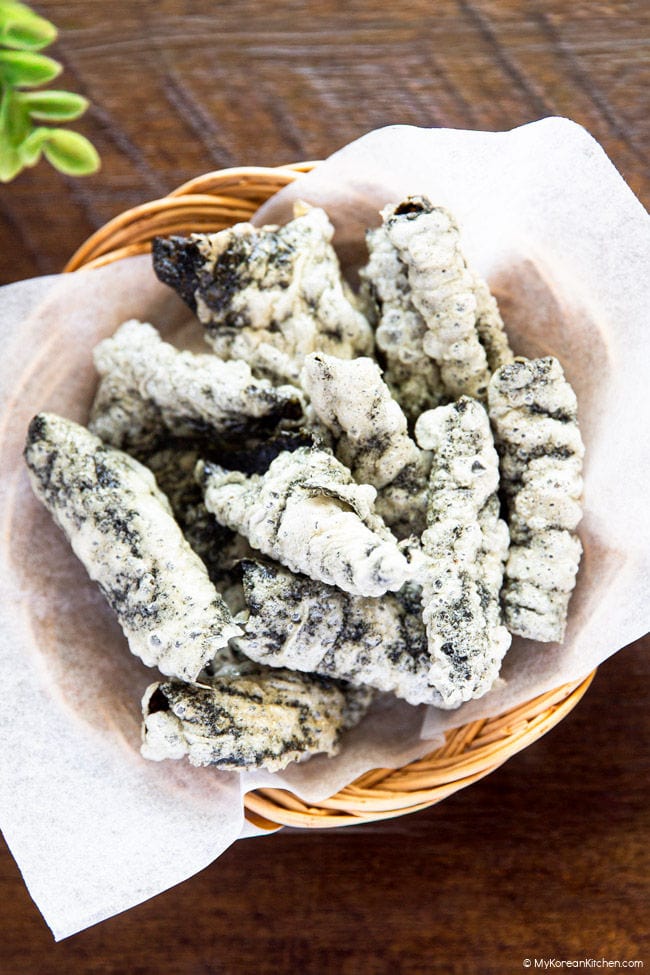
6. Serve:
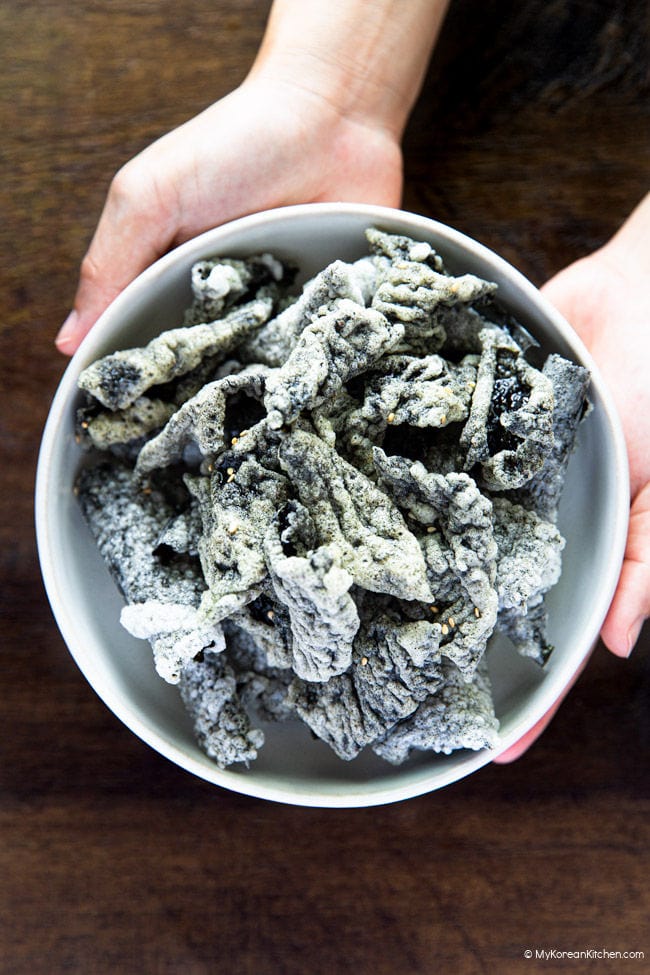
Let the seaweed chips cool completely before serving. They will become even crispier as they cool. Enjoy them as a snack, appetizer, or as a crunchy side dish (banchan). If you have leftovers, store them in an airtight container. For longer storage and the best texture, see the storage tips below.
My Best Tips for Perfectly Crispy Gim Bugak
Keep the Rice Paste Thin
The rice paste should be thin and smooth, similar to a light pancake batter. It should spread easily over the seaweed and coat it evenly without clumping or looking heavy. If the coating is too thick or pasty, the chips can turn hard instead of light and crispy. A thin batter is what allows the surface to puff beautifully in the oil.
If you are aiming for that pretty snowflake effect from the glutinous rice paste, you can apply it a little more generously, but keep the paste itself thin. That balance helps create the delicate white blossom look when fried without making the chips heavy.
Dry Thoroughly Before Frying
This step really matters. The coated seaweed must be completely dry before it goes into the oil. It should feel dry and slightly stiff to the touch. If it is not dried long enough, it can splatter and will not puff properly. A little patience here makes a big difference in the final texture. Be patient with the drying process. Properly dried seaweed will yield the best texture when fried.
Fry at the Right Temperature
Make sure the oil is properly heated before frying. If the temperature is too low, the seaweed will absorb oil and taste greasy instead of crisp. When you add it to the oil, you should see gentle bubbling around the edges, and the surface will puff slightly. The bubbling should be active but not aggressive, and within seconds, the chips will turn lightly golden and crisp.
Do Not Air Fry
Air frying is not recommended for this recipe. In my testing, the seaweed lifted and flew around inside the air fryer due to the strong circulating heat, and it quickly scorched when it hit the heating element. I had to stop the machine immediately. Because of both the safety concern and the inconsistent texture, I do not recommend this method. Traditional frying gave the most reliable light, airy, and crisp results in my kitchen.
I also tested the microwave method after seeing others try it, but it did not produce the same airy crispness. The coating stayed relatively flat and the texture was uneven. For the best and most dependable results, traditional frying worked beautifully in my kitchen.
Prevent Chewy Texture
If your chips turn chewy, it is usually due to one of three reasons. The seaweed was not fully dried before frying, the oil temperature was too low, or the chips absorbed moisture after cooking, especially in humid weather. Make sure they are fully dried, fried at the correct temperature, and cooled completely before storing to maintain that beautiful crunch.
Storage Tips
Let the chips cool completely before storing. Even a little trapped heat can create condensation, which will soften that beautiful crunch. For best results, store them in the freezer in a well-sealed airtight container or ziplock bag. Even at room temperature, they can start to lose their crispness within a few hours, especially in humid weather.
The freezer provides a dry, low-humidity environment that helps preserve their light, airy texture. When you are ready to enjoy them, simply take them out about one minute before eating. Because the chips are so thin, they can be enjoyed almost immediately, and you will still get that satisfying crunch, even after up to 3 months!
Quick Look: Making Korean Seaweed Chips
Korean Seaweed Chips (Gim Bugak)
Ingredients
- 1 1/2 cups water (375 ml)
- 1 piece dried kelp (5 x 5 cm, about 2 x 2 inches)
- 1/2 cup glutinous rice flour (sweet rice flour), (80 g)
- 1/2 tsp fine salt
- 2 tsp sugar (optional, for a hint of sweetness)
- 1/8 tsp sesame oil
- 7 sheets dried seaweed (gim)
- neutral oil (such as rice bran oil or avocado oil)
- sesame seeds (optional, for garnish)
Instructions
- Prepare the Glutinous Rice Paste: Start by making a quick kelp stock for extra depth of flavor. In a small saucepan, combine the water and dried kelp. Heat over medium heat until the water is just about to simmer, then remove the kelp. Avoid boiling the kelp for too long, as it can release bitterness. Use this kelp stock in place of plain water for a deeper, more savory flavor. If you do not have dried kelp, simply use water.In the same saucepan, whisk the glutinous rice flour into the prepared kelp stock until the flour is fully dissolved and no lumps remain. Stir in the salt and sugar. Place the saucepan over medium heat and cook, stirring constantly with a whisk or spatula, until the mixture thickens into a smooth paste, about 3 to 5 minutes. Remove from the heat and stir in the sesame oil. Let the paste cool slightly before using.
- Coat the Seaweed: Lay one sheet of seaweed on a flat surface, shiny side facing down. Using a brush or spatula, spread a thin but generous layer of rice paste evenly over the entire surface. Make sure you coat it properly from edge to edge. A gloved hand works beautifully too, especially if you want better control. Repeat with the remaining seaweed sheets.
- Dry the Seaweed: Once all the seaweed sheets are evenly coated, let them dry completely before moving on. The sheets should feel fully dry and crisp to the touch. The drying time will vary depending on how thickly the rice paste was applied and the surrounding humidity.You can dry the seaweed in several ways:Sun drying - Arrange the sheets on a wire rack or baking rack and place them in direct sunlight for about 2 to 3 hours, or until completely dry and crisp. Elevating the seaweed on a rack allows air to circulate underneath, helping it dry more evenly. In humid weather, this may take longer.Dehydrator - Dry the sheets using a low heat or vegetable setting until they are fully dry and crisp.Oven drying - Preheat the oven to 100 C (212 F). Arrange the seaweed sheets on a lightly oiled sheet pan and dry for 40 to 60 minutes, or until completely dry.Do not line the pan with baking paper, as it can slow the drying process by reducing airflow underneath. Instead, lightly brush oil directly onto the sheet pan so the seaweed releases easily once dried.
- Cut the Dried Seaweed into Pieces: Cut the dried seaweed sheets into bite sized rectangles before frying. Kitchen scissors work best for this. Aim for pieces about 4 to 5 cm wide and 6 to 8 cm long (about 1.5 to 2 inches by 2.5 to 3 inches). Try to keep the pieces fairly even so they fry at the same speed.
- Fry the Seaweed: Heat the oil in a deep frying pan or wok to 356 F (180 C). Make sure there is enough oil to fully submerge the seaweed pieces so they fry evenly. Carefully slide a few pieces into the hot oil, one at a time. Fry for about 10 to 20 seconds, or until they puff up and turn lightly golden. Use a slotted spoon or spider strainer to lift the chips out of the oil and transfer them to a plate lined with paper towels to drain any excess oil. Repeat with the remaining pieces.
- Serve: Let the seaweed chips cool completely before serving. They will become even crispier as they cool. Enjoy them as a snack, appetizer, or as a crunchy side dish (banchan). If you have leftovers, store them in an airtight container. For longer storage and the best texture, see the storage tips below.
Nutrition Info (per serving)
The nutrition information shown is an estimate provided by an online nutrition calculator. It should not be considered a substitute for a professional nutritionist’s advice.
")

")