Making makgeolli at home takes a little patience and attention, but it is very rewarding to watch the fermentation change from day to day.
Made with rice, nuruk (a traditional Korean fermentation starter), and water, this traditional Korean rice wine becomes lightly creamy, gently fizzy, and pleasantly tangy as it ferments. The flavor also changes over time, so it helps to know the signs that tell you when it is ready.
In this recipe, we’ll walk you through each stage, including the fermentation cues we use to decide when to strain and enjoy the makgeolli.

Save This Recipe For Later
You can unsubscribe at any time
What Is Makgeolli?
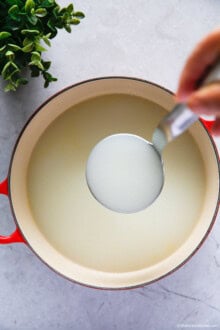
Makgeolli (막걸리) is a traditional Korean rice wine made by fermenting rice with nuruk (누룩) and water. It has a cloudy, milky appearance and is usually lightly sweet, tangy, and gently fizzy, with a soft rice aroma.
Makgeolli has been enjoyed in Korea for centuries. It was traditionally associated with farmers and rural communities, but today it is widely enjoyed throughout Korea and increasingly overseas as well.
At its most basic, makgeolli is made with rice, nuruk, and water. The nuruk provides enzymes and microorganisms that help break down the starch in the rice into fermentable sugars. Some brewers also add yeast to support a more active and reliable fermentation, as we do in this recipe.

Why You’ll Love This Recipe
Tested over multiple brewing runs
We started testing this makgeolli back in February, and after several batches, we finally landed on a version we were really happy with. Each batch helped us fine-tune the flavor, texture, and sweetness until it tasted the way we wanted.
A little daily care makes a difference
Makgeolli isn’t difficult to make, but it does need some attention while it ferments. We found that giving it a thorough stir each day helps keep the rice, nuruk, and liquid well mixed as the fermentation develops.
Inspired by Jipyeong Makgeolli
Jipyeong Makgeolli, a long-established Korean brand known for its smooth, easy drinking style, became our reference point during testing, and I think this homemade version comes remarkably close in flavor. I’ve never been a huge makgeolli drinker myself, which is probably why I’m especially pleased with how much I enjoy this one.

Ingredients
Main
- 900 g (31.7 oz / 4 cups) uncooked short-grain white rice, such as sushi rice
- 1 liter (4 cups) water, for fermentation
Yeast Mixture
- 1 tsp dry yeast
- 1/2 tsp granulated sugar
- 80 ml (1/3 cup) water
Nuruk Mixture
- 2/3 cup nuruk
- 165 ml (2/3 cup) water
To Finish
- 2 liters (8 cups) water
- 6 Tbsp granulated sugar
* 1 cup = 250 ml; 1 Tbsp = 15 ml.
How to Make Makgeolli
1. Prepare the yeast and nuruk mixtures.
Combine the yeast, sugar, and water in a small bowl and stir well. In a separate bowl, combine the nuruk and water and stir until evenly moistened. Set both mixtures aside for about 3 hours.
After about 1 hour, move on to Step 2 so the rice and the two mixtures are ready at roughly the same time.

2. Soak and steam the rice.
Gently rinse the rice until the water runs mostly clear. Cover with fresh water and soak for 1 hour, then drain thoroughly.
Bring the water in a steamer to a boil. Add the drained rice, cover, and steam over high heat for 40 minutes. Turn off the heat and leave the rice covered in the steamer for another 10 minutes.
The rice should be fully cooked but firm and relatively dry, with distinct grains rather than a soft or sticky texture. Steaming gives the rice a drier texture than rice cooked in a rice cooker, which works better for this style of fermentation.

3. Cool the rice.
Spread the steamed rice out on a baking sheet in a thin, even layer so the heat can escape quickly. Let it cool until it no longer feels warm and is cool to the touch, about 15 to 20 minutes in my experience.

4. Mix the rice and nuruk.
Before adding the nuruk and yeast mixtures, make sure the rice has cooled and no longer feels warm. Excessive heat can weaken the yeast and interfere with fermentation.
Transfer the cooled rice to a very large mixing bowl or basin (I used a 42 cm / 12.5 L bowl) and add the prepared nuruk mixture.
Using clean hands, rub and massage the rice and nuruk together for 10 to 15 minutes, gently breaking apart the rice as you go. Continue until the nuruk is evenly distributed and there are no large clumps of rice remaining. This thorough mixing helps the nuruk work evenly through the rice during fermentation.

5. Add the yeast mixture.
Pour in the prepared yeast mixture and mix thoroughly.

6. Start the fermentation.
Add 1 liter (4 cups) of water and mix well.

Transfer the mixture to a large, clean fermentation jar or container (I used a 4.2L jar), leaving plenty of headspace for bubbling and expansion. Cover the opening with a clean cloth and secure it tightly around the rim with a rubber band. Rest the lid loosely on top without sealing it. Ferment at about 23–25°C (73–77°F) for around 4 days.

Once a day, use a clean, long-handled spatula to stir the mixture thoroughly from the bottom upward. Make sure the rice and liquid are well redistributed rather than just stirring the surface.

As fermentation becomes more active, you should notice more bubbling, a stronger alcoholic aroma, and a lightly fizzy sensation when you taste it. Using a clean spoon, taste a small amount each day to see how the flavor is developing. The rice should also gradually soften and break down.

Around 4 days worked well for this batch, but use the timing as a guide. Fermentation speed can vary depending on the temperature and the activity of the nuruk and yeast.

If fermented for longer, the makgeolli will generally become less sweet and more sour, with a more pronounced fermented and alcoholic character. Once it reaches the balance of sweetness and acidity that you prefer, it is ready to strain.
7. Strain the makgeolli.
Place a large, fine straining bag over a colander set inside the same very large mixing bowl or basin. I used a nut milk bag. A fine cloth can also be used if needed, but avoid a coarse cloth such as sambe, as it can allow too much sediment to pass through.
Pour the fermented rice mixture into the bag, pull the drawstring or gather the top securely, then squeeze and massage the bag firmly against the colander so the liquid drains into the bowl below.
When the rice has broken down well during fermentation, there should be relatively little solid residue left behind. Better rice breakdown also means more of the batch can be extracted as makgeolli.

8. Rinse, dilute, and sweeten.
Pour 2 liters (8 cups) of water over the straining bag containing the remaining rice and nuruk solids, letting the liquid drain into the same bowl as the strained makgeolli.

Use your hands to gently work and rinse the solids through the bag, helping release any remaining liquid and flavor. Squeeze the bag well to extract as much liquid as possible.

Remove the straining bag and discard the remaining solids.
Add 6 Tbsp granulated sugar and stir until dissolved. Taste and add more sugar if desired. The finished batch should yield approximately 4 liters (16 cups) of makgeolli.

9. Bottle and refrigerate.
Transfer the makgeolli to clean glass jars, leaving some headspace at the top. I used four 1-liter jars for this batch.
Refrigerate promptly. During the first few days, check the jars regularly and carefully release any excess pressure if needed.
Open the jars slowly and carefully, as continued fermentation can produce carbon dioxide and build pressure inside.

Ingredient Notes
- Nuruk is a traditional Korean grain-based fermentation starter used to make makgeolli and other Korean alcoholic drinks.

- Dry yeast: I used Tandaco Dry Yeast. If you’re in the US, instant yeast or active dry yeast can also be used.

Recipe Notes
- Choose a wide-mouth fermentation jar. A wide opening makes it much easier to reach the bottom and stir the mixture thoroughly each day. Choose a jar large enough to leave plenty of headspace for bubbling and expansion.
- Rice texture matters. The steamed rice should be fully cooked but firm and relatively dry rather than soft and sticky. This texture helps the nuruk break down the rice more evenly during fermentation.
- Mix the rice and nuruk thoroughly. The 10 to 15 minute hand-mixing step is important. Breaking apart the rice and distributing the nuruk evenly helps the fermentation progress more consistently.
- Temperature affects fermentation speed. Around 23–25°C (73–77°F) worked well for this recipe. Cooler conditions generally slow fermentation, while warmer conditions can make it progress more quickly.
- Good rice breakdown improves yield. When fermentation progresses well, much of the rice softens and breaks down rather than remaining as firm solids. This usually means less residue after straining and more makgeolli.
- Makgeolli naturally separates. The rice sediment will settle during storage. Gently turn or shake the bottle before serving to redistribute it.
Serving Suggestions
Serve makgeolli well chilled. For a lighter, milder drink, serve it over ice. As the ice melts, it gently dilutes the makgeolli and softens the alcohol. If you prefer it a little sweeter, stir in a small amount of sugar to taste.
For a softer, slightly sweeter variation with a hint of tang, mix 3 parts makgeolli with 1 part probiotic drink, such as Yakult, and stir gently.
Storage
Keep homemade makgeolli refrigerated and enjoy it within about 1 week for the freshest flavor.
Because fermentation continues slowly in the refrigerator, the makgeolli will generally become less sweet and more acidic over time, and carbonation may continue to build.
If you notice visible mold, unusual discoloration, or an unpleasant rotten smell rather than the expected sour, fermented aroma, discard it.

More Ways to Enjoy Makgeolli
Baechujeon
Lightly crisp around the edges with tender napa cabbage inside, these savory Korean cabbage pancakes are exactly the kind of thing I want alongside a cold bowl of makgeolli.
Dubu Kimchi
Warm tofu, savory pork, and tangy stir-fried kimchi make this a hearty, satisfying dish that is especially good with makgeolli. It is a classic Korean drinking food combination for good reason.
Kimchi Jeon
Crisp around the edges, tender in the center, and packed with the tangy flavor of well-fermented kimchi. A hot kimchi pancake with chilled makgeolli is one of those pairings that just works.
Makgeolli Shake
For something sweeter, try blending makgeolli with vanilla custard and ice cream. It is smooth, lightly fizzy, and almost dessert-like. A fun way to enjoy makgeolli in a completely different form.

Makgeolli (Korean Rice Wine)
Ingredients
Main
- 900 g uncooked short-grain white rice (31.7 oz / 4 cups), such as sushi rice
- 1 liter water (4 cups), for fermentation
Yeast Mixture
- 1 tsp dry yeast
- 1/2 tsp granulated sugar
- 80 ml water (1/3 cup)
Nuruk Mixture
- 2/3 cup nuruk
- 165 ml water (2/3 cup)
To Finish
- 2 liters water
- 6 Tbsp granulated sugar
Instructions
- Prepare the yeast and nuruk mixtures. Combine the yeast, sugar, and water in a small bowl and stir well. In a separate bowl, combine the nuruk and water and stir until evenly moistened. Set both mixtures aside for about 3 hours.After about 1 hour, move on to Step 2 so the rice and the two mixtures are ready at roughly the same time.
- Soak and steam the rice. Gently rinse the rice until the water runs mostly clear. Cover with fresh water and soak for 1 hour, then drain thoroughly.Bring the water in a steamer to a boil. Add the drained rice, cover, and steam over high heat for 40 minutes. Turn off the heat and leave the rice covered in the steamer for another 10 minutes.The rice should be fully cooked but firm and relatively dry, with distinct grains rather than a soft or sticky texture. Steaming gives the rice a drier texture than rice cooked in a rice cooker, which works better for this style of fermentation.
- Cool the rice. Spread the steamed rice out on a baking sheet in a thin, even layer so the heat can escape quickly. Let it cool until it no longer feels warm and is cool to the touch, about 15 to 20 minutes in my experience.
- Mix the rice and nuruk. Before adding the nuruk and yeast mixtures, make sure the rice has cooled and no longer feels warm. Excessive heat can weaken the yeast and interfere with fermentation.Transfer the cooled rice to a very large mixing bowl or basin (I used a 42 cm / 12.5 L bowl) and add the prepared nuruk mixture.Using clean hands, rub and massage the rice and nuruk together for 10 to 15 minutes, gently breaking apart the rice as you go. Continue until the nuruk is evenly distributed and there are no large clumps of rice remaining. This thorough mixing helps the nuruk work evenly through the rice during fermentation.
- Add the yeast mixture. Pour in the prepared yeast mixture and mix thoroughly.
- Start the fermentation. Add 1 liter (4 cups) of water and mix well.Transfer the mixture to a large, clean fermentation jar or container (I used a 4.2L jar), leaving plenty of headspace for bubbling and expansion. Cover the opening with a clean cloth and secure it tightly around the rim with a rubber band. Rest the lid loosely on top without sealing it. Ferment at about 23–25°C (73–77°F) for around 4 days.Once a day, use a clean, long-handled spatula to stir the mixture thoroughly from the bottom upward. Make sure the rice and liquid are well redistributed rather than just stirring the surface.As fermentation becomes more active, you should notice more bubbling, a stronger alcoholic aroma, and a lightly fizzy sensation when you taste it. Using a clean spoon, taste a small amount each day to see how the flavor is developing. The rice should also gradually soften and break down.Around 4 days worked well for this batch, but use the timing as a guide. Fermentation speed can vary depending on the temperature and the activity of the nuruk and yeast.If fermented for longer, the makgeolli will generally become less sweet and more sour, with a more pronounced fermented and alcoholic character. Once it reaches the balance of sweetness and acidity that you prefer, it is ready to strain.
- Strain the makgeolli. Place a large, fine straining bag over a colander set inside the same very large mixing bowl or basin. I used a nut milk bag. A fine cloth can also be used if needed, but avoid a coarse cloth such as sambe, as it can allow too much sediment to pass through.Pour the fermented rice mixture into the bag, pull the drawstring or gather the top securely, then squeeze and massage the bag firmly against the colander so the liquid drains into the bowl below.When the rice has broken down well during fermentation, there should be relatively little solid residue left behind. Better rice breakdown also means more of the batch can be extracted as makgeolli.
- Rinse, dilute, and sweeten. Pour 2 liters (8 cups) of water over the straining bag containing the remaining rice and nuruk solids, letting the liquid drain into the same bowl as the strained makgeolli.Use your hands to gently work and rinse the solids through the bag, helping release any remaining liquid and flavor. Squeeze the bag well to extract as much liquid as possible.Remove the straining bag and discard the remaining solids.Add 6 Tbsp granulated sugar and stir until dissolved. Taste and add more sugar if desired. The finished batch should yield approximately 4 liters (16 cups) of makgeolli.
- Bottle and refrigerate. Transfer the makgeolli to clean glass jars, leaving some headspace at the top. I used four 1-liter jars for this batch.Refrigerate promptly. During the first few days, check the jars regularly and carefully release any excess pressure if needed.Open the jars slowly and carefully, as continued fermentation can produce carbon dioxide and build pressure inside.
Notes
Recipe Notes
- Use a wide-mouth jar with plenty of headspace. This makes daily stirring much easier and gives the mixture room to bubble and expand.
- Watch the rice texture. The rice should be fully cooked but still firm and relatively dry, rather than soft or sticky.
- Mix the rice and nuruk thoroughly for 10 to 15 minutes. This helps break up the rice and distribute the nuruk evenly, which is important for a good fermentation.
- Ferment at about 23–25°C (73–77°F). This temperature range worked well during our testing. Cooler conditions will slow the fermentation, while warmer conditions will speed it up.
- Makgeolli naturally separates as it sits. Gently turn or swirl the container before serving to mix it back together.
Serving Suggestions
Serve makgeolli well chilled. For a lighter, milder drink, you can serve it over ice. If you prefer it a little sweeter, stir in a small amount of sugar to taste. For a softer, slightly sweeter variation with a gentle tang, mix 3 parts makgeolli with 1 part probiotic drink, such as Yakult.Storage
Keep homemade makgeolli refrigerated and enjoy it within about 1 week for the freshest flavor. It will continue to ferment slowly in the refrigerator, becoming less sweet and more acidic over time. Carbonation may also continue to build. Discard the makgeolli if you notice visible mold, unusual discoloration, or a clearly rotten smell that is different from its normal sour, fermented aroma.Nutrition Info (per serving)
The nutrition information shown is an estimate provided by an online nutrition calculator. It should not be considered a substitute for a professional nutritionist’s advice.
Save This Recipe For Later
You can unsubscribe at any time