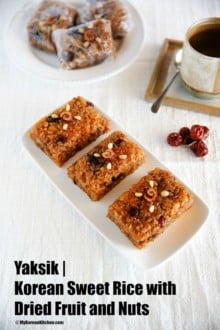
Archive for the 'Vegetarian' Category

Print This Post Print This Post

Spicy, Sweet and Vinegary Noodles (Bibim Guksu)

Bibim Guksu05292

This bibim guksu is something I am very much enjoying making and eating lately. I made this 5 times last week already. Yes! it is that tasty and morish. I just can’t get sick of it. Besides, it doesn’t require any complicated preparation or cooking.

Its main taste comes from the sauce, which has a slightly spicy, sweet and sour taste, and the fragrance from the sesame oil is another pleasant experience.

Bibim guksu is a popular Korean summer dish, because the spicy and sour taste rejuvenates your lost appetite in drowsy hot humid summer days. For me, looking at this picture is good enough for now. How about you?

Bibim Guksu05291

Ingredients for 2 people (Ready in 10-15 minutes)

Noodles

  • 180 g organic soba noodles

Toppings

  • 2 medium lettuce leaves, thin sliced
  • 1/4 a leaf red cabbage, thin sliced
  • 1/2 a small cucumber, julienned
  • 1/3 a small carrot, julienned
  • A few snow pea sprouts
  • 2 tbsp thumb nail size Kimchi

Sauce (mix these in a bowl)

  • 2 tbsp gochujang
  • 2 tbsp rice vinegar
  • 1 tbsp soy sauce
  • 1 tbsp honey
  • 1 tbsp brown sugar
  • 1 tbsp Korean sesame oil
  • 1 tbsp roasted sesame seeds

Method

  1. Boil the noodles in boiling water for about 3 minutes.
  2. Sieve the noodles and run the cold water thoroughly over the noodles to cool them down.
  3. Place the noodles in a bowl and add the toppings and sauce.
  4. Mix them well and dig in.

Cook’s Note

You can alter the toppings as you wish, like adding boiled egg or white radish pickle etc. Also if you want more spicy taste, you may add some Korean chili powder or minced garlic in the sauce and more vinegar for a sour taste. However, before you add anything into the original sauce, make sure you taste it first to ensure it tastes good.

The noodles I used for this recipe

Bibim Guksu noodles 0529

HAKUBAKU organic soba (ingredients : wheat flour 69%, buckwheat flour 29%, salt 2 %, water), Price - about AU $2.30, available at Woolworth or Coles
The noodles are conveniently divided into 3 portions with white paper straps.

Technorati , , , ,
Print This Post Print This Post

Garlic Chives and Baked Garlic Salad

Garlic Chives and Baked Garlic Salad 2

( Garlic Chives and Baked Garlic Salad with Grilled Pork)

Do you like garlic? I don’t like eating raw garlic but I love eating baked garlic. It is delicately flavoured and has a savory taste, what is more it doesn’t smell as bad as raw garlic. Some naturopaths seem to think that once the garlic is baked, it is not as beneficial. Yet, some Koreans seem to believe that when the garlic is baked what it mostly loses is the bad smell and the good enzymes still remains. What do you think about this?

While I was wondering around Internet the other day, I found this very simple dish and it turned out to be a wonderful salad, which includes some baked garlic and garlic chives. I think this salad goes well with red meat, especially with pork or as one of the side dishes with rice. It has a slightly sour taste and the flavour and smell from the baked garlic is just so nice. Later, I wished that I had added more garlic.

Benefits of the garlic are ;

  • Supports the immune system
  • Helps digestion
  • Delays aging
  • Enhances blood circulation
  • Lowers cholesterol

Ingredients (for a 2 people serving)Garlic Chives and Baked Garlic Salad step1

  • Garlic chives - one fistful (about 40 g)
  • 8 cloves of fresh garlic
  • Olive oil - 2 tsp
  • Salt - 1/10 tsp

Dressing sauce (mix these in a bowl)

  • Soy sauce - 2 tsp
  • Apple vinegar - 2 tsp
  • Olive oil - 2 tsp
  • Dark brown sugar - 1 tsp
  • Pepper - 2 sprinkles

Steps

Garlic Chives and Baked Garlic Salad step2

  1. Thin slice the garlic.
  2. Put the olive oil and salt in a small bowl.
  3. Add the garlic and mix it well.
  4. Bake the garlic for 10 minutes at 180 ℃ (My oven is mini by the way) .
  5. While you are waiting, clean the garlic chives and cut them into 6-7 cm lengths.
  6. Put the baked garlic and garlic chives in a mixing bowl.
  7. Add the dressing sauce and lightly mix them with chopsticks.
  8. Serve them on a dish.

Garlic Chives and Baked Garlic Salad 1

This post has been submitted to WHB (Weekend Herb Blogging) hosted by Kalyn’s Kitchen. I don’t know how often I am going to participate in this blog event, but I think it is good to share some health beneficial food with you from time to time.

Related Posts

Pork Belly BBQ (Samgyeopsal Gui)

Tuna Salad Sushi Rolls

Technorati ,
Print This Post Print This Post

Seasoned Acorn Jelly (Dotori Muk Muchim)

Seasoned Acorn Jelly (Dotori Muk Muchim)1

When I was a child, I sometimes went hiking with my mom and we picked up some dropped acorns in the hills. I didn’t hike to the very top but on the way back the basket of my bicycle was full of acorns. At that time I didn’t know how they could be eaten by us, humans, because I always thought that they are for squirrels.

In my memory, I don’t think I liked the seasoned acorn jelly that much because of its bitter taste, but now I love it, it is like an adult appreciates good food more than a child. It has a slightly bitter taste from the acorn jelly and a slightly sweet and salty taste from the sauce, which I love, and this recipe is like that.

Seasoned Acorn Jelly (Dotori Muk Muchim)2

Hoping you can get the acorn jelly where you live, here is how the recipe goes.

Ingredients (enough to serve 6-8 people as a side dish) : 5 minutes to serve

  • Acorn jelly (도토리묵) - 420 gSeasoned Acorn Jelly (Dotori Muk Muchim) ingredients
  • 2-3 lettuce leaves
  • 1 green chili (non spicy)

Sauce (mix these in a bowl)

  • Soy sauce - 6 tbsp
  • Dark brown sugar - 1 tbsp
  • Sesame oil - 1 tbsp
  • Finely chopped spring onion - 2 tbsp
  • Parched sesame seed - 1 tbsp
  • Chili powder - 2 tsp
  • Minced garlic - 2 tsp

Prep

  1. Slice the acorn jelly (1 cm -1.5 cm thickness).
  2. Take the seeds out from the chili and thin slice it.
  3. Thin slice the lettuce (thickness doesn’t really matter, but mine was close to 1 cm).

Method A) - Better presentationSeasoned Acorn Jelly (Dotori Muk Muchim) method

  1. Put the sliced acorn jelly on the plate.
  2. Add the sliced chili on top.
  3. Decorate the plate with the lettuce.
  4. Spread the sauce on the top.
  5. Serve it on the table.

Method B) - My mom’s way (it may season the acorn jelly and lettuce better)

  1. Put the lettuce, chili and acorn jelly in a mixing bowl.
  2. Add the sauce and lightly mix it.
  3. Serve it on the plate.

Seasoned Acorn Jelly (Dotori Muk Muchim)4

By the way, a pack of acorn jelly is more expensive than tofu (I thought it would be cheap). It was 3,000 won (US $3.20) for 420 g in Korea. I also bought a pack of acorn powder to make acorn jelly from scratch and it was 6,6oo won (US $6. 30). It was requested by one of my readers. I know I really need to make it soon but apparently it requires continuous stirring for nearly an hour without any break, so I gave up for then. :(

Don’t worry! beloved, I will definitely do it. :)

Related Posts

Soy sauce Boiled Tofu (Dubu Ganjang Jorim in Korean)

Tofu Kimchi (Dubu Kimchi in Korean)

Simmered Lotus in Soy sauce (Yeon-gn Jorim)

Technorati ,